Switches are probably the single-most important device on a Pinball Playfield, and are fundamental to the game itself. The entire Pinball Machine is essentially an electro-mechanical interaction, with the switch being the all-important middle-man between the ball and the active mechanisms…
Switches also pre-date a lot of the other devices we commonly associate with Pinball, like Flippers, Thumpers, Slingshots, etc. and most machines today still use some manner of the traditional wire-form activated leaf-switch we find on older games.
The focus of this blog is on solid-state based Custom Pinball Machines, and one advantage with SS when it comes to switches is that they can be scanned as a matrix. Most SS games since the 70’s have used this technique. With matrix scanning, you can read 40 switches with 5 drive lines and 8 read lines (5×8 = 40), but only use 13 digital I/Os (5+8 = 13). And just to hammer home the math, that saves 27 I/Os (40-13 = 27), putting this in the wheelhouse of a small micro-controller board like the Arduino Uno.
The Layout.
Here’s a typical schematic (below) of a switch matrix from a standard Bally 70’s solid-state (SS) game. I present this because it will serve us well even today since the principles are the same.
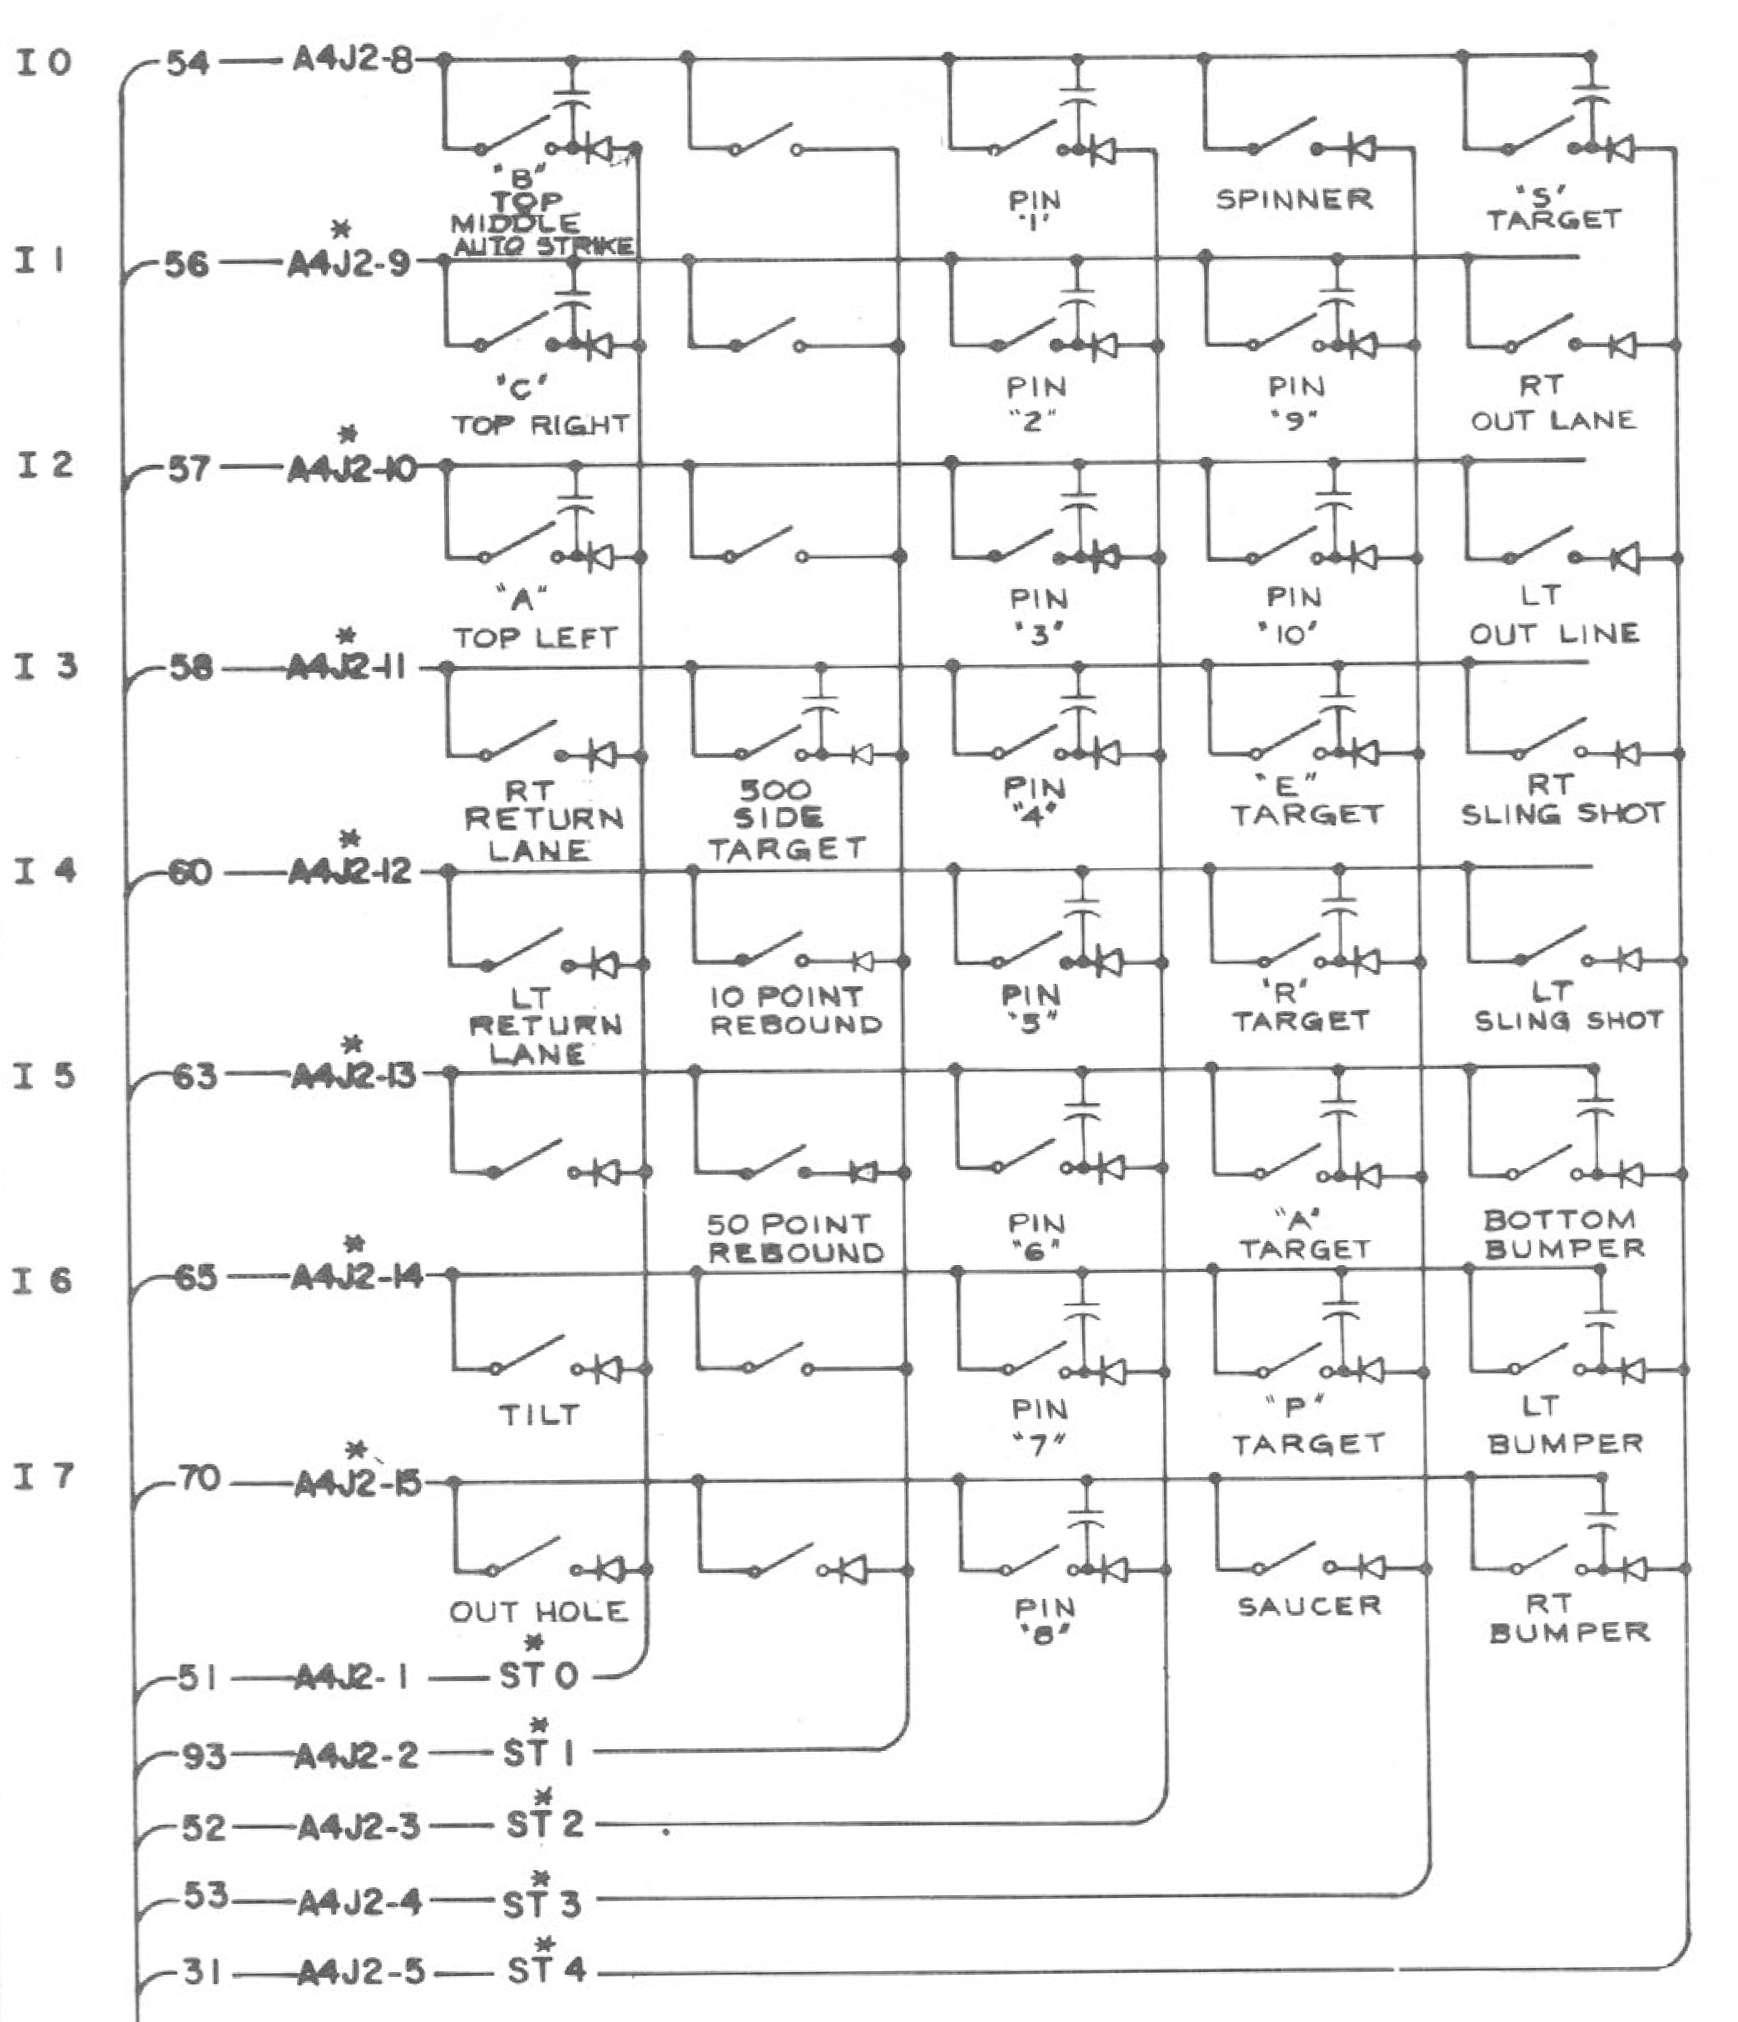
Schematic of a switch matrix designed to be scanned by solid-state electronics. For our Custom Pinball Machine, we will use a micro-controller like the Arduino Uno.
Scanning The Matrix:
In the case above, there are five drive lines and eight sense lines, which we will model for our own design. The process of scanning works like this:
- All the drive lines are initially held low.
- The first drive line is switched high.
- Each of the eight sense lines are read.
- These values then represent the state of switches 1 thru 8.
- The first line returns low, and the second line goes high.
- Again, read in the eight sense lines.
- These values become the state of switches 9 thru 16.
- And so on until all 40 switch states are read…
Notice that each switch in the schematic has a diode on the drive side. This prevents “ghosting” in the case of multiple switches being active at the same time. Without it, the current from one drive column could back-feed through any switches active on the same row, in essence driving a second (unintended) column. An active switch on the second column would create a “ghost” activation on the first (real) drive column.
Below is a spreadsheet I usually create during the design of the game, and reference for the assembly and wiring.
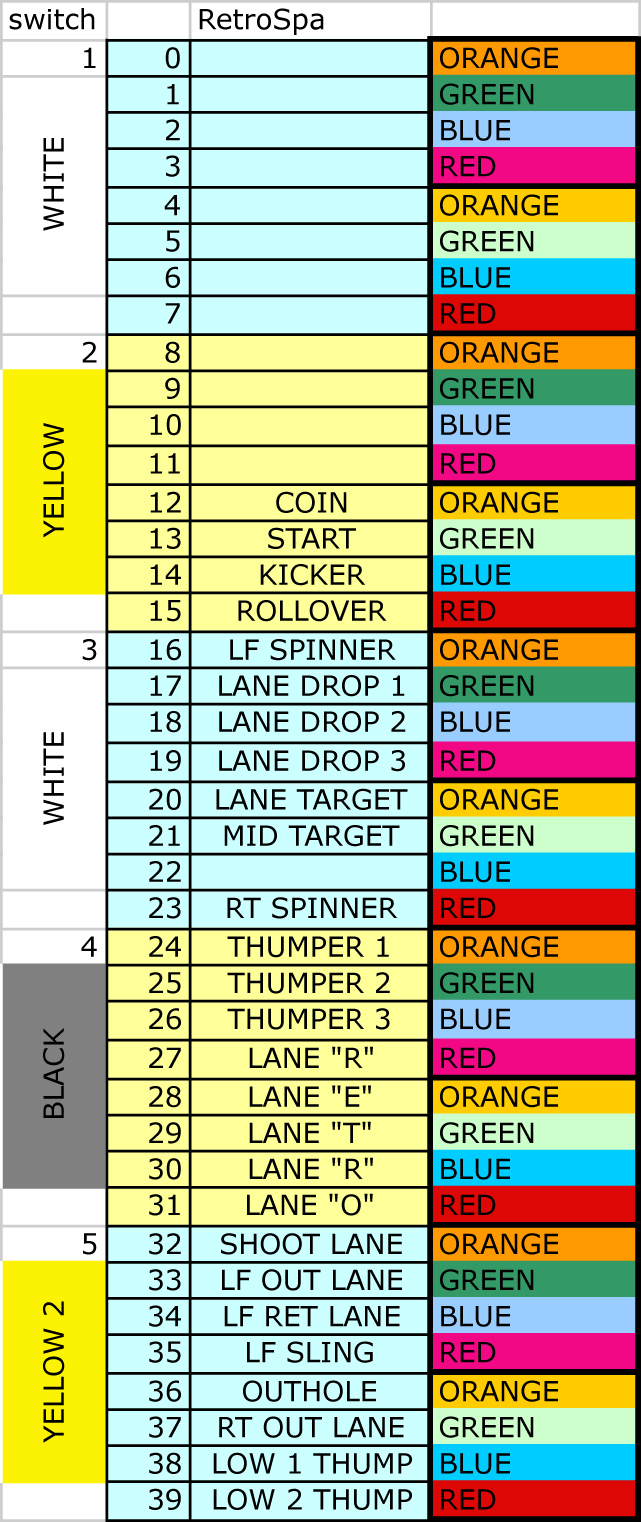
Excel spreadsheet showing switch signal names with drive wire colors and sense line colors.
Most older games made use of two-color striped wire, so there was never a duplicate color combination for any signal. In our case, it’s more feasible to use a limited set of standard colors, and just keep track of where there might be duplicates.
I always create a chart like this early on, giving the switches logical names and grouping them based roughly on where they will be located on the playfield. It helps to use the same name later in the Arduino code that will be doing the scanning.
The Switch.
Almost all older games use leaf-switches connected to a wire-form for activation. These usually have three contacts, and the diode mentioned above is mounted directly on the switch. This make wiring easier and more mechanically stable.
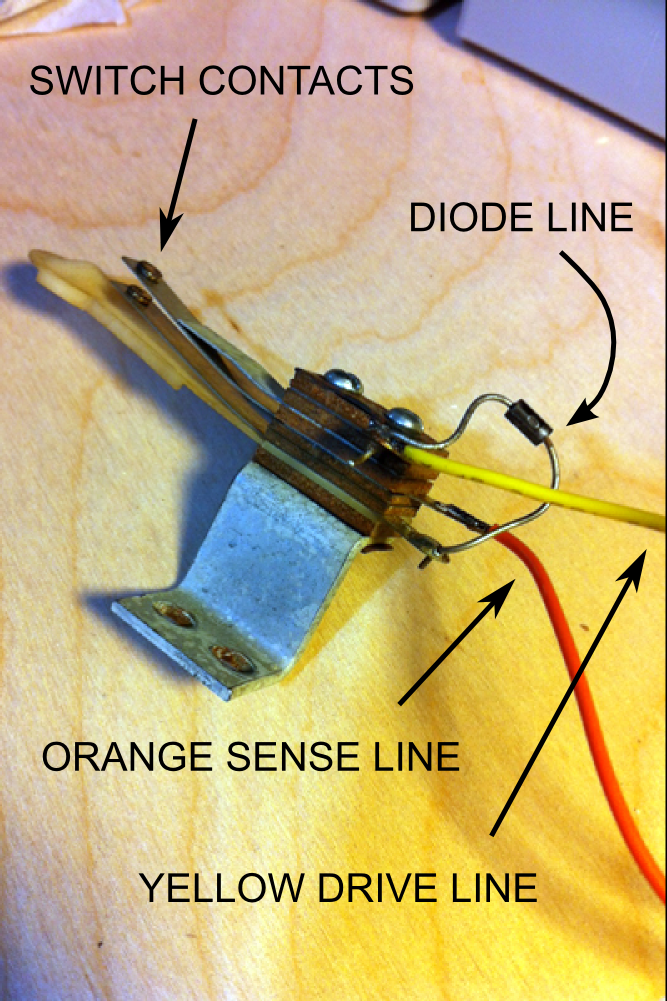
This is a typical “spoon” switch used to activate Thumpers. There is a built-in diode, with the drive wire coming in on the positive side (yellow), and a sense wire on the negative side (orange).
The Code.
Below can be cut-and-pasted into an Arduino project. Use this for testing and diagnostics, or as a reference for creating your own game code.
There are several features to this code aside from just scanning the switch matrix, hopefully it will become clear as you read though it:
- The code compares the previous state of the switch to the current state to determine if the state is “new”
- It then rotates the state for the next loop so that current becomes previous.
- It only call the state “new” if it went low-to-high, you can change this in your own code.
- It implements a de-bounce timer function, which is adjustable, or just comment it out.
- Prints the “new” switch state to the serial monitor when switch is activated.
// --------------------------------------------
/*
INSTRUCTIONS:

This code will scan a 5x8 switch matrix and print the status of new switch states.

CODE FLOW:

  -  Set the first drive line output.
  -  Scan first input.
  -  If state was low, and now high, set new switch flag.
  -  Send message out to Serial Monitor (optional).
  -  Loop through all eight inputs.
  -  Loop through all five drive lines.
  -  Delay.
  -  Repeat.

For questions or comments, check the blog:
https://howtobuildapinballmachine.wordpress.com

*/

//  --------------------------
//  BUILD VARIABLES HERE
#define DEBOUNCE_MODE 1
#define SERIAL_MONITOR 1

//  --------------------------
//  VARIABLES
unsigned char j = 0;	//
unsigned char i = 0;	//
unsigned char k = 0;	//

//  --------------------------
//  SWITCHES
unsigned char switchStateNow[40];	// start no digit selected
unsigned char switchStatePrev[40];	// start no digit selected
unsigned char switchNew[40];	//
unsigned char switchDebounce[40];
// --------------------------
// DEFINE SWITCH NAMES HERE
// optional for this test code, but good idea
// if you are going to build on this as a game later.
enum
{
SWITCH_0,
SWITCH_A, // was 1
SWITCH_B, // was 2
SWITCH_C, // was 3
SWITCH_D, // was 4
SWITCH_5,
SWITCH_6,
SWITCH_7,

SWITCH_8,
SWITCH_9,
SWITCH_10,
SWITCH_11,
SWITCH_START,
SWITCH_COIN,
SWITCH_KICKER,
SWITCH_ROLLOVER,

SWITCH_LF_SPINNER, // 16
SWITCH_LANE_DROP_1,
SWITCH_LANE_DROP_2,
SWITCH_LANE_DROP_3, // kicker / shoot again
SWITCH_LANE_TARGET,
SWITCH_MID_TARGET,
SWITCH_22,
SWITCH_RT_SPINNER,

SWITCH_THUMPER_1, // BLACK - ORANGE
SWITCH_THUMPER_2, // BLACK - GREEN
SWITCH_THUMPER_3, // BLACK - BLUE

SWITCH_LANE_R_1,
SWITCH_LANE_E,
SWITCH_LANE_T,
SWITCH_LANE_R_2,
SWITCH_LANE_O,

SWITCH_SHOOT_LANE,
SWITCH_LF_OUT_LANE,
SWITCH_LF_RET_LANE,
SWITCH_LF_SLING,
SWITCH_OUTHOLE,
SWITCH_RT_OUT_LANE,
SWITCH_LOW_1_THUMP, //SHOOT_LANE,
SWITCH_LOW_2_THUMP // 39
};

#define SWITCH_DEBOUNCE_DURATION 10 //10 loops
void setup()
{
  pinMode(14,OUTPUT); // analog in used a row drive out
  pinMode(15,OUTPUT);
  pinMode(16,OUTPUT);
  pinMode(17,OUTPUT);
  //pinMode(18,OUTPUT); // if only using four drive lines, no need to set this

  pinMode(2,INPUT); // analog in used a row drive out
  pinMode(3,INPUT); // analog in used a row drive out
  pinMode(4,INPUT); // analog in used a row drive out
  pinMode(5,INPUT); // analog in used a row drive out
  pinMode(6,INPUT); // analog in used a row drive out
  pinMode(7,INPUT); // analog in used a row drive out
  pinMode(8,INPUT); // analog in used a row drive out
  pinMode(9,INPUT); // analog in used a row drive out

  digitalWrite(2,LOW); // pull up on
  digitalWrite(3,LOW); // pull up on
  digitalWrite(4,LOW); // pull up on
  digitalWrite(5,LOW); // pull up on
  digitalWrite(6,LOW); // pull up on
  digitalWrite(7,LOW); // pull up on
  digitalWrite(8,LOW); // pull up on
  digitalWrite(9,LOW); // pull up on

#if (SERIAL_MONITOR == 1)
  Serial.begin(9600);           // start serial for output
#endif

//  --------------------------
//  INITIALIZE SWITCH STATE ON, SINCE WE TRIGGER ON RISING EDGE
  for (j = 0; j < 40; j++)
  {
    switchStateNow[j] = 1; //
    switchStatePrev[j] = 1;//
    switchNew[j] = 0;
    switchDebounce[j] = 100;
  }

} // end setup
void loop()
{
  //  *****************************************
  //  -----------------------------------------
  //             START READ SWITCH
  //  -----------------------------------------
  //  *****************************************

  // SET DRIVE LINES HERE
  for (j = 1; j < 5; j++)
  {
    // START ALL LOW (no signal)
    digitalWrite(14, LOW); // pins 14-17
    digitalWrite(15, LOW); // pins 14-17
    digitalWrite(16, LOW); // pins 14-17
    digitalWrite(17, LOW); // pins 14-17

    // DRIVE ONE LINE HIGH
    digitalWrite((j+13), HIGH); // pins 14-17

    // WAIT HERE FOR RISE TIME
    delayMicroseconds(400) ;

    // START SCAN
    for (i = 0; i < 8; i++)
    {
      switchStatePrev[((j*8) + i)] = switchStateNow[((j*8) + i)]; // rotate variable
      switchStateNow[((j*8) + i)] = digitalRead(i + 2); // pins 2-9

      // check for a "new" state
    #if (DEBOUNCE_MODE)
      if ((switchStateNow[((j*8) + i)] == switchStatePrev[((j*8) + i)]) || (switchDebounce[((j*8) + i)] > 0))
    #else
      if ( switchStateNow[((j*8) + i)] == switchStatePrev[((j*8) + i)])
    #endif
      {
        switchNew[((j*8) + i)] = 0; // same as old
      } // end if

      else // must be new if not old and new equals one
      {
        if (switchStateNow[((j*8) + i)] == 1)
        {
          switchNew[((j*8) + i)] = 1; // new

          #if (DEBOUNCE_MODE)
            switchDebounce[((j*8) + i)] = SWITCH_DEBOUNCE_DURATION; // set timer
          #endif

          #if (SERIAL_MONITOR == 1)
            Serial.print("Switch = ");
            Serial.print((j*8) + i); // TODO check this formatting later
            Serial.print("\r\n");
          #endif
        }
      } // end else
    } // end for i
  } // end for j

  #if (DEBOUNCE_MODE)
    for (j = 0; j < 40; j++)
    {
      if (switchDebounce[j] > 0)
      {
        switchDebounce[j] -= 1; // ramp down to zero
      }
    }
  #endif

  delay(10) ; // 10ms loop time

  // end read switches

//return;

} // end MAIN LOOP
